To Get Started
Start by reading Installing plugins section in our comprehensive WordPress and WordPress Multisite Manual if you are new to WordPress.
Configuring the Settings
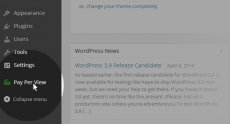
Once installed and activated, you’ll see a new menu item in your WordPress Dashboard: Pay Per View
After clicking ‘Pay Per View’ go to the ‘General Settings’ to get your Plugin set up.
 6. Once you’ve completed your General Settings (which should be straight forward), you can move on to create your first post, using the Pay Per View Plugin functionality.
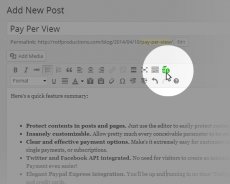
When creating a new post or page, there will be a new tool in your editor: The Pay Per View Selection Tool
This button is for adding Pay Per View protection to the current selected content. Upon clicking, there will be a Pay Per View pop up window that will allow you to set a brief description of the selected content, and set your price as well.
Pay Per View also has some unique options in the sidebar when creating a new page or post.
1. Enabled: Selects if Pay Per View is enabled for this post or not.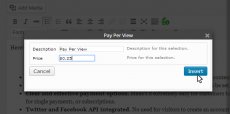 If ‘Follow global setting’ is selected, General Setting page selection will be valid. ‘Always enabled’ and ‘Always disabled’ selections will enable or disable Pay Per View for this post, respectively, overriding general setting.
2. Method: Selects the content protection method for this post. If ‘Follow global setting’ is selected, method selected in General Settings page will be applied. If you want to override general settings, select one of the other methods. With ‘Use Selection Tool’ you need to select each content using the icon on the editor tool bar. For other methods refer to the settings page.
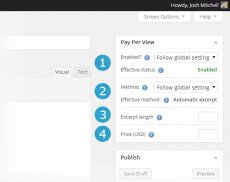 3. Excerpt length: If you want to override the number of words that will be used as an excerpt for the unprotected content, enter it here. Please note that this value is only used when Automatic Excerpt method is applied to the post.
4. Price (USD): If you want to override the default price to reveal this post/page, enter it here. This value is NOT used when Selection Tool method is applied to the post.
There we have it! Click ‘Publish’ and view the final result:
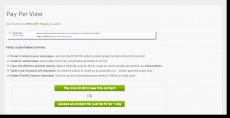 Final result when using the WPMU DEV Network Theme
Final result when using the WordPress Twenty Eleven Theme
Using Pay-per-view Directly In Your Templates
If you want to protect content that is outside of the post content (in a custom field, for example) then you can use the template function wpmudev_ppw_html.
This function replaces the HTML with payment buttons, revealing the content only when payment is confirmed.


 HBO (Home Box Office) is an American premium cable television network, owned by Time Warner, under the operating subsidiary Home Box Office Inc. As of January 2012, HBO's programming reaches 29 million subscribers in the United States, making it the second largest...